As usual, we eventually sought out props to photograph with. As usual, we ended up getting one of my huge fuck off knives, then a mattock, then a sword, and finally a chainsaw.
Afterward, I chose my 4 favourite shots and brought out the gimp (no, not that gimp, this gimp!). Then I wrote an incredibly sensitive and heart warming childrens story for each one.
Enjoy.
Weigh in and pre-match psych out

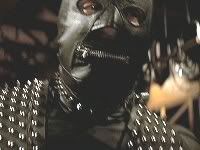
omg click to enlarge bitch
So my auntie came up to me and my 2 little cousins and was like "YO, one of y'all do the dishes!", and immediately me and my older little cousin put our thumbs to our foreheads.
My younger little cousin hates doing the dishes. In fact, he would rather die. Consequently, his face turned red as he bared his teeth and pulled out his knife.
His words blasted off his furiously flapping tongue, "You bitches think you can tell me what to do?!?! Huh?! Fuck that shit! Let mortal kombat begin!"
And so it began ....
Round one

omg click to enlarge bitch
Always eager to butcher my little cousin, I ran to the shed and searched for the most brutal looking garden implement I could find. The giant orange mattock in the corner looked brutal enough to castrate a dinosaur. Perfect.
We met each other in the yard. Looking him in the eye, I gave him one chance to back out, "You think you can come up here and take a piece of this? Huh? Ill tell you something. You're gonna die."
In reply he gave me detailed instructions on exactly how I should go about copulating with a pencil sharpener. It didn't sound pleasant. I took that as a "yes" and charged.
I came in hard and high, hoping to cleave his skull with one good blow and splatter his brains on the ground for my dog. At the last fraction of a second, he darted sideways, puncturing my side with several jackhammer-like stabs before jumping back.
He'd hit me! Unbelievable! Looking him in the eye, I cursed with language so colourful you'd swear we were back in the 70's.
He snorted like a horse and ran at me with intense blood lust. But I was ready. I slapped that bitch down so hard there were tears in his eyes. Then the fight began in earnest...
It raged....
and raged...
Until finally, dazed, I stumbled around in a barely conscious stupor.
Like lightening, his knife flashed as he sliced my eyeballs right out of their sockets. But before I could let loose a single curse, the knife flashed again and then he was stuffing my eye sockets with my own severed testicles.... FATALITY.
Round two

omg click to enlarge bitch
If you thought that watching me getting slaughtered would force my older younger cousin (Commando) to yield to my younger younger cousin (Killalot) then you have clearly underestimated how much we hate doing dishes.
Commando went in search of some elite weaponry and returned with a samurai sword. Seeing this, Killalot decided to upgrade his own kill gear. He went to his room, rummaged around under his bed and came back with his favourite chainsaw.
Seeking the psychological high ground, Commando taunted: "When im done mutilating your corpse, im gonna kidnap your cat and rape the shit outta him every night for the rest of his life." Killalot replied matter-of-factly, "Go ahead, he likes it rough."
Taken aback by this, Commando tried some more conventional material. He launched into a detailed exposition of exactly how he would use his sword to extract Sir Killalot's beating heart out of his body via his anus. He thought that the whole "ill rip your heart out and show it to you" angle would have Killalot wetting himself, but the details bored Killalot and he stopped listening after a couple of sentences.
Commando tried one last time, "Bitch! Im gonna mutilate your genitals, stir fry them, and feed them to---", but before he could finish, Killalot raised his chainsaw, snorted with more vigour than 10 wild stallions and charged.
To be concluded ...
Round two point five

omg click to enlarge bitch
The kombat began.
It was brutal. Really brutal. In fact, the brutality cannot be adequately described without resorting to alliterative testicle metaphors. It was ball breaking, sack splitting, gonad grinding, testy tearing, scrotum shattering, nad napalmingly brutal.
Commando's sword slashed. Deadly and swift with maximal finesse. Making razor cuts here and there but never striking a fatal blow.
Killalot, on the other hand, took the opposite approach. He flung his chainsaw around and around, roaring and biting, as though it were some psychotically fucked off lion he'd grabbed by the tail.
Their weapons crashed, bashed and smashed like the four drum kits of the apocalypse. Their snorting would have put rhinos to shame. Their facial expressions would have set churches on fire. Their foul cursing would have caused nuclear weapons to spontaneously detonate.
Eventually Sir Killalot won out and finished Commando off with The Voltron Maneuver, cutting him in half right down the middle.
Game Over.
Insert Coin.
....
Epilogue:
So me and my cousin were dead. But not for long. On account of our exceptional deeds, the Almighty saw fit to resurrect us into the afterlife immediately.
After we got settled in to hell, my other cousin employed the services of The Transdimensional Courier Agency to deliver the dishes down to us. We cleaned them and sent them back.


